
For crystal-clear specimen photography, diffuse your flash with softboxes or DIY materials to eliminate harsh shadows. Position lights at 45-degree angles to reveal dimensionality while using reflectors for fill light. Set up multiple flashes to capture translucent details without overexposure. Balance flash with microscope lighting by adjusting exposure compensation to around -1.33. Consider macro flash brackets for precise positioning and consistent focus. These five techniques will transform your specimen images from flat to fascinatingly detailed.
Diffusing Flash Light for Even Specimen Illumination

Why do specimen photographs often appear flat or riddled with harsh shadows? The culprit is typically undiffused flash light creating hotspots that obscure critical details.
You’ll achieve even illumination by placing diffusers between your flash and specimen. Softboxes and umbrellas work excellently, but DIY solutions like tracing paper or white bedsheets are cost-effective alternatives. These materials scatter light particles, creating softer, more uniform coverage across your subject.
For ideal light quality, increase the distance between your flash and diffuser. This enhances the diffusion effect while maintaining color accuracy—crucial for scientific documentation.
Don’t forget to adjust your flash power downward when using a diffuser to prevent overexposure.
The result? A clear representation of your specimen with reduced shadows, preserved texture details, and none of those distracting bright spots.
Positioning Techniques to Eliminate Unwanted Shadows
Even when using diffusers, your specimen photographs can still suffer from distracting shadows if your flash isn’t properly positioned.
Place your light sources at a 45-degree angle above and to the side of your specimen to create dimensional lighting while avoiding flat results.
Position light at 45-degree angles to reveal specimen dimensionality while preventing flat, lifeless photographs.
Master bounce flash by directing light toward walls or ceilings to create beautifully soft light that wraps around your subject.
For stubborn shadows, try backlighting—positioning your flash behind the specimen highlights edges while eliminating frontal shadows completely.
Don’t overlook reflectors as valuable tools for redirecting fill light into shadowy areas without adding harsh illumination.
Finally, experiment with flash distance to fine-tune intensity and coverage.
Adjusting these positioning techniques alongside your camera settings and exposure settings will dramatically improve your Flash Photography results, revealing specimen details that might otherwise remain hidden in shadow.
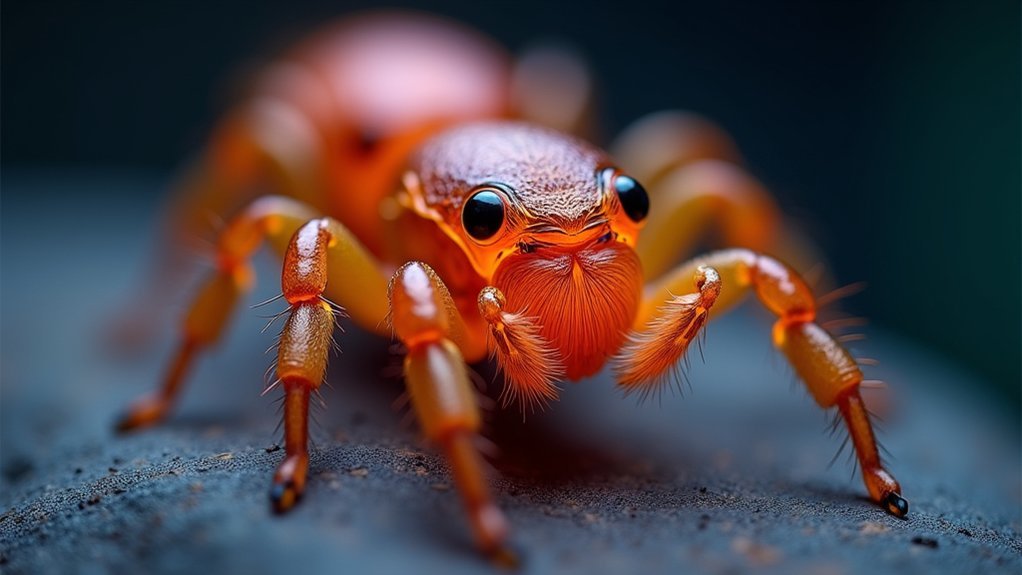
Multi-Flash Setup for Capturing Translucent Details

When photographing translucent specimens, a single flash source often fails to reveal the intricate internal structures that make these subjects fascinating. A well-executed multi-flash setup creates depth and dimension by illuminating your subject from multiple angles.
Position your main flash to highlight surface details, then add backlighting techniques with a second flash behind the specimen to enhance transparency. Use softboxes to minimize harsh shadows and achieve even illumination throughout.
| Flash Position | Purpose | Manual Flash Setting |
|---|---|---|
| Front-Top | Surface texture | 1/4 power |
| Side | Edge definition | 1/8 power |
| Behind | Translucent details | 1/2 power |
Adjust each flash’s exposure independently, controlling light intensity to balance illumination across delicate features. This approach guarantees translucent details remain visible without overexposing any area of your specimen.
Balancing Flash Power With Ambient Microscope Lighting
Microscopes with built-in illumination systems present unique challenges for specimen photographers who need to incorporate flash lighting.
To achieve ideal results, you’ll need to properly balance your flash with the microscope’s ambient light. Start by setting your flash exposure compensation (FEC) to approximately -1.33, creating a natural blend between flash and ambient light without overwhelming delicate specimen details.
Adding a diffuser will soften the light and eliminate harsh shadows that might obscure important features. Position your flash at an angle that enhances visibility of details while avoiding glare and reflections.
For complete control, switch to manual flash settings which allow for precise adjustments based on your specific specimen’s characteristics.
Don’t hesitate to experiment with different configurations—finding the perfect balance often requires testing various combinations until your specimen’s features appear crisp and naturally illuminated.
Macro Flash Brackets for Perfect Specimen Focus
To achieve tack-sharp specimen photographs with ideal lighting, you’ll need to incorporate specialized macro flash brackets into your setup.
These versatile tools allow precise positioning of your flash units, ensuring even illumination while dramatically reducing harsh shadows that often plague close-up photography.
You’ll appreciate how macro flash brackets maintain a consistent distance between camera and subject—crucial for sharp focus in specimen work.
Most models accommodate multiple flash units, enabling creative lighting setups that reveal subtle textures and details otherwise lost in flat lighting.
For best results, look for brackets that feature built-in diffusion panels or attachment points for diffusers.
This flexibility lets you control the direction of light with precision, softening harsh reflections on shiny specimens while highlighting specific features you want to emphasize in your documentation.
Frequently Asked Questions
How Can I Make My Flash Pictures Look Better?
Use an external speedlight instead of pop-up flash. Bounce light off walls or ceilings. Add diffusion material to soften light. Adjust Flash Exposure Compensation to balance with ambient light. Try manual exposure settings for better control.
How Do You Take Crystal Clear Pictures?
You’ll get crystal clear pictures by using a tripod, remote trigger, and proper manual settings (1/200 sec, ISO 200, f/11). Don’t forget to stabilize your camera and shoot multiple rapid images for the best results.
What Is the Best Setting for Flash Photography?
For flash photography, you’ll want to use manual mode with 1/200 second shutter speed, f/11 aperture, and ISO 200. Start with TTL mode and adjust with Flash Exposure Compensation for perfectly balanced lighting.
How to Mimic Sunlight for Photos?
To mimic sunlight in photos, position your flash at a 45-degree angle, use a diffuser to soften light, add warm-colored gels (around 5500K), and combine with ambient light using slower shutter speeds.
In Summary
You’ve now mastered the essentials of flash photography for specimen documentation. By diffusing light, positioning strategically, using multiple flashes, balancing power settings, and employing proper brackets, you’ll capture stunning images that reveal even the finest details. Remember, it’s not about expensive equipment—it’s your technique that transforms ordinary specimens into extraordinary visual records. Keep experimenting with these approaches to elevate your scientific photography.


Leave a Reply