To capture stunning transmitted light photos, keep your ISO low (100-200) to minimize noise and maintain detail. Select your aperture based on leaf thickness: f/2.8-f/4 for thin leaves, up to f/16 for complex venation. Use slower shutter speeds (1/60+) with a tripod for enhanced colors. Match white balance to your light source for accurate rendition. Apply positive exposure compensation (+1 or +2) for backlit subjects. These five adjustments will transform your botanical photography completely.
Optimizing ISO Values for Clarity in Transmitted Light

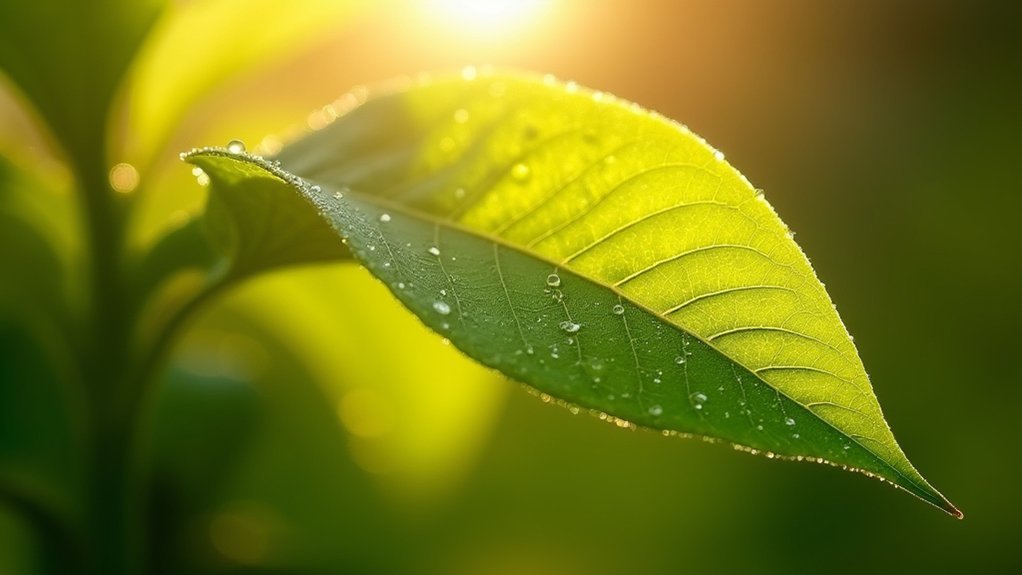
While capturing transmitted light through leaves or translucent objects, your ISO setting plays an essential role in image quality.
Keep your ISO as low as possible—ideally between 100-200—to minimize noise and preserve fine details in the delicate structures you’re photographing.
Low ISO settings (100-200) reveal nature’s intricate details while preserving the delicate beauty transmitted light unveils.
Higher values above ISO 400 introduce graininess that can obscure the intricate patterns transmitted light reveals.
Use your camera’s histogram to achieve ideal exposure without raising ISO unnecessarily. In brighter conditions, you’ll easily maintain these lower values.
If you’re shooting in dimmer environments, you might need to increase ISO to maintain a faster shutter speed and prevent blur.
However, consider the trade-off carefully.
Shooting in raw image format gives you more flexibility to address minor exposure issues during post-processing while maintaining the clarity transmitted light photography demands.
Aperture Selection for Detail Preservation
With ISO optimized, your aperture setting becomes the next critical factor in capturing transmitted light effectively. Select apertures between f/2.8 and f/4 when you need more light to pass through delicate leaves, revealing intricate details. For complex venation patterns, narrow your aperture to f/8-f/16 to increase depth of field and guarantee sharpness across the entire leaf surface.
| Aperture Range | Best For | Effect on Detail |
|---|---|---|
| f/2.8-f/4 | Thin leaves | Enhances light transmission |
| f/4-f/5.6 | Medium texture | Balances light and sharpness |
| f/5.6-f/8 | Detailed patterns | Improves overall clarity |
| f/8-f/11 | Thick leaves | Maximizes depth of field |
| f/11-f/16 | Complex venation | Guarantees complete detail preservation |
Remember to avoid extremely wide apertures below f/2.8, as they can blur important features due to shallow depth of field.
Shutter Speed Adjustments for Light Balance

After selecting the ideal aperture, shutter speed becomes your next essential control for balancing transmitted light through leaves.
Shutter speed is your critical tool for mastering the dance of light as it passes through delicate leaf structures.
When taking pictures with light coming from behind your subject, you’ll want to adjust your shutter speed to capture the rich details and colors properly.
- Use slower speeds (1/60 or longer) to allow more light to reach your sensor, enhancing colors and revealing intricate leaf structures.
- Set your shutter as low as possible during golden hour when the warmer light creates stunning transmitted effects.
- Mount your camera on a tripod when using slower speeds to prevent motion blur and maintain sharpness.
- Take multiple shots at different speeds, especially in varying brightness conditions – faster speeds (1/125+) for bright scenarios, slower for dim lighting.
White Balance Techniques for Accurate Color Rendering
Because transmitted light photography relies heavily on color accuracy, proper white balance settings become essential for capturing the true essence of your subject.
Match your white balance to your light source—use ‘Daylight’ setting for natural sunlight and ‘Tungsten’ for indoor lighting.
For precise control, utilize the Kelvin scale: set to 5500K for daylight and 3200K for tungsten illumination. You’ll need to adjust based on your specific lighting conditions.
When standard presets don’t deliver accurate color rendering, create a custom white balance by photographing a neutral gray card under your current lighting conditions. This calibrates your camera to the exact light temperature you’re working with.
Check your histogram regularly to verify color channel balance, ensuring your whites are truly white and colors appear natural.
Exposure Compensation for Challenging Lighting Conditions
Mastering exposure compensation revolutionizes your ability to photograph transmitted light scenes that often confuse camera meters.
When capturing leaf details, you’ll need to override your camera’s automatic settings to achieve ideal results in varying lighting conditions.
- Apply positive compensation (+1 or +2) when photographing backlit leaves to reveal intricate vein patterns and translucent details.
- Use negative compensation (-1 or -2) in high-contrast scenarios to preserve details in bright areas without losing information.
- Make incremental adjustments in 1/3 or 1/2 stops for precise control over your exposure.
- Check your histogram after each shot to determine if further adjustments are needed.
Frequently Asked Questions
What Camera Settings Should I Use for Different Lighting?
For different lighting, you’ll need to adjust your ISO (low in bright, high in dim), aperture (small in bright, wide in dim), and shutter speed (faster outdoors, slower indoors) accordingly.
What Camera Settings Are Needed for Light Trails?
For light trails, you’ll need a low ISO (100-200), small aperture (f/8-f/16), and slow shutter speed (4-30 seconds). Use manual mode and a tripod to prevent camera shake during these long exposures.
How Can I Make My Camera More Sensitive to Light?
You can make your camera more sensitive to light by increasing the ISO setting, using a wider aperture (lower f-stop), and setting slower shutter speeds. Shooting in RAW format also preserves more light information for editing.
What Camera Settings Are Best for Light Painting Photography?
For light painting photography, you’ll want to use ISO 100, a slow shutter speed (5+ seconds), small aperture (f/8-f/16), manual mode, and experiment with white balance to control colors in your light trails.
In Summary
By mastering these five essential camera settings, you’ll transform your transmitted light photography. Remember, it’s all about balancing ISO for noise control, choosing the right aperture for depth, adjusting shutter speed for proper exposure, setting accurate white balance, and using exposure compensation when needed. Don’t be afraid to experiment—your perfect transmitted light photo requires practice but delivers stunning results worth the effort.


Leave a Reply