
To stop lab vibrations from ruining your images, identify and eliminate environmental sources first. Choose dense flooring materials with vibration-damping properties and implement passive isolation systems using mass-spring techniques. Add mass to your equipment setup and place instruments strategically on stable areas away from traffic. Schedule imaging during early mornings or evenings when activity is minimal. Finally, install acoustic panels and viscoelastic damping compounds at mounting points. These practical solutions will transform your imaging results profoundly.
Identify and Eliminate Environmental Vibration Sources
The battle against laboratory vibrations begins with proper identification of their sources. Your sensitive lab instruments are vulnerable to both external and internal vibrations that can greatly compromise image quality.
Identifying vibration sources is your first defense in protecting sensitive instruments from image-compromising movements.
External culprits include road and rail traffic, construction work, and industrial operations, while internally, foot traffic and building services contribute to disruptive movements.
Effective vibration control requires strategic planning. You’ll need to conduct regular vibration surveys to pinpoint problem areas and select ideal equipment locations away from mechanical systems.
Consider implementing resilient materials beneath rail ties near your facility and constructing barrier walls around high-traffic areas to reduce external vibration transmission.
Don’t overlook your building’s design—it’s vital for minimizing vibration effects. By systematically identifying and addressing these sources, you’ll create a more stable environment for precise imaging results.
Choose Optimal Flooring and Surface Materials
Because your imaging equipment can detect even microscopic movements, selecting the right flooring and surface materials becomes a critical defense against vibration interference.
Opt for heavy, dense materials like concrete or stone that considerably reduce vibration transmission. Incorporating vibration-damping underlayment beneath floors provides an additional absorption layer, creating a more stable foundation for your sensitive instruments.
For maximum Vibration Isolation, consider these proven solutions:
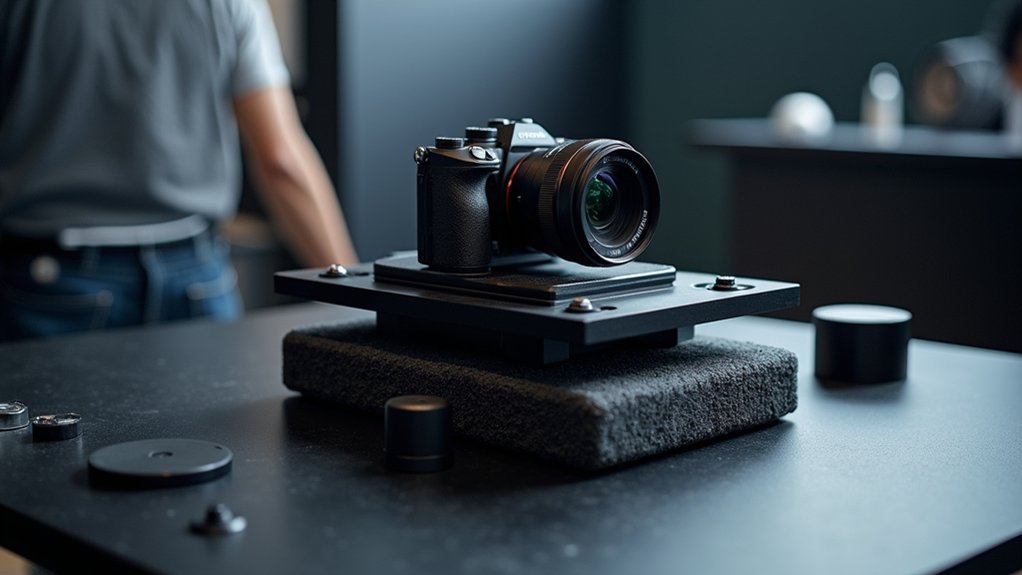
- Install specialized isolation mats directly under microscopes and imaging devices to shield them from environmental disturbances
- Avoid lightweight flooring systems that flexibly transmit vibrations throughout your lab space
- Confirm your floor design incorporates appropriate stiffness and mass to minimize structural movements that compromise image quality
Don’t let poor flooring choices undermine your precision imaging work.
Implement Passive Vibration Isolation Systems
You’ll find remarkable success with mass-spring dampening techniques that function like car suspension, effectively absorbing vibrations down to -1 Hz without requiring power sources.
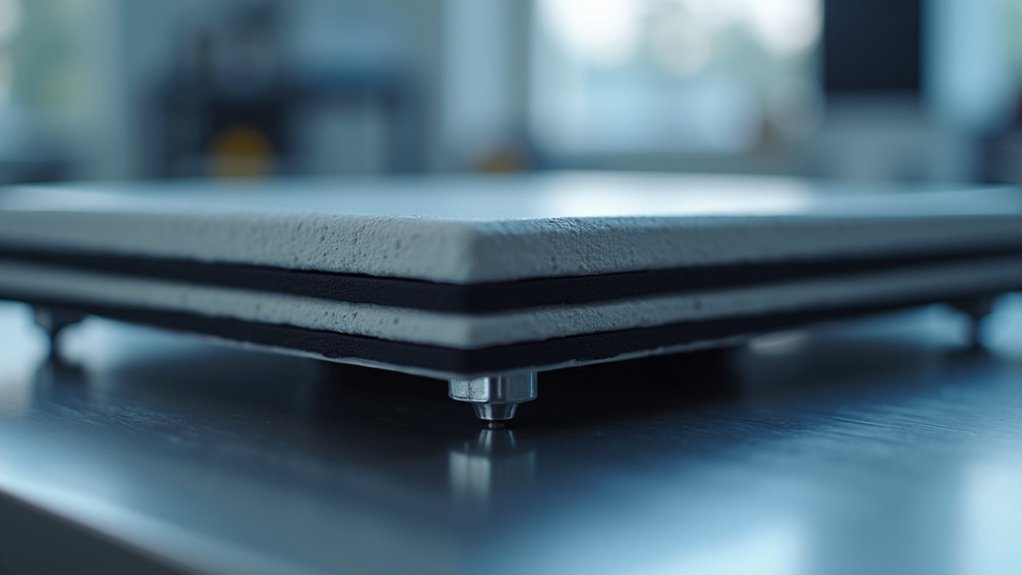
Cork-based isolation platforms offer exceptional low-frequency isolation properties, making them ideal components in thorough passive systems for sensitive instrumentation.
Proper implementation of these passive isolation systems will dramatically improve your data quality while protecting delicate equipment from environmental vibrations that could otherwise compromise experimental results.
Mass-Spring Dampening Techniques
Implementing passive vibration isolation systems offers a reliable foundation for sensitive laboratory equipment protection.
Mass-spring dampers utilize the simple yet effective principle of absorbing vibrations through strategically placed springs and heavy masses. You’ll find these systems can effectively reduce vibrations down to 0.5 Hz, protecting your most sensitive microscopy equipment from unwanted movement.
For best results, place your mass-spring dampers on slab-on-grade foundations and consider incorporating materials like cork to enhance low-frequency isolation performance.
- Imagine capturing perfect, crystal-clear images without the frustration of vibration-induced blur
- Feel the confidence that comes with knowing your research won’t be compromised by building vibrations
- Experience the satisfaction of solving persistent vibration problems with a reliable, passive solution
Cork-Based Isolation Platforms
Cork-based isolation platforms represent a natural evolution in passive vibration control systems. These innovative solutions leverage cork’s unique properties—low density and high energy absorption capacity—to effectively dampen unwanted vibrations transmitted from external sources like foot traffic and machinery.
You’ll find these platforms particularly effective at reducing low-frequency vibrations that can compromise your imaging results. By placing sensitive equipment on cork isolation systems, you’re creating a buffer that prevents environmental disturbances from affecting your precision instruments.
The benefits extend beyond performance—cork is renewable and eco-friendly, allowing your lab to maintain sustainability commitments while improving data quality.
It’s a cost-effective approach that enhances the stability of delicate lab equipment, ultimately delivering more reliable results and clearer images for your critical research applications.
Add Mass to Your Imaging Equipment Setup
Three simple words can revolutionize your lab’s imaging quality: add more weight. Increasing mass considerably reduces vibrations by stabilizing your equipment and minimizing movement during critical imaging operations.
Position your setup on concrete pavers or thick slabs to enhance stability and dampen floor-transmitted vibrations.
Keep the center of mass low in your design to improve stability and reduce oscillation potential. Incorporating dense materials like sand or lead into your equipment’s base effectively absorbs disruptive vibrations that compromise image clarity.
- Your painstaking research deserves crisp, vibration-free images
- Don’t let months of preparation be ruined by preventable equipment movement
- Clear, stable images lead to publications, while blurry ones lead to frustration
Remember to recalibrate your equipment after making mass adjustments to guarantee ideal performance.
Strategic Equipment Placement Within Your Laboratory

You’ll need to assess structural vibration nodes to identify ideal positioning for your sensitive equipment.
Map your lab’s floor stability profiles to determine which areas offer the greatest vibration isolation and support for precision instruments.
Create dedicated isolation zones away from high-traffic areas, building facades, and mechanical systems to guarantee your imaging equipment maintains peak performance.
Assess Structural Vibration Nodes
When designing your laboratory space, strategic equipment placement can make the difference between capturing perfect images and dealing with constant vibration artifacts.
You’ll need to identify structural vibration nodes by evaluating your building’s foundational characteristics. Position sensitive imaging equipment on slab-on-grade foundations rather than above grade in lightweight structures where vibrations travel more freely.
Keep your equipment away from:
- Building facades that expose your instruments to unpredictable external noise sources
- Mechanical and electrical systems that generate disruptive vibrations
- Upper floors that amplify even minor vibration sources
Don’t wait until after construction to evaluate placement—incorporate vibration control strategies during early design phases.
This proactive approach will meaningfully improve image quality and save you countless hours of troubleshooting vibration-related problems.
Map Floor Stability Profiles
Strategic equipment placement requires thorough floor mapping to identify stability zones within your laboratory.
You’ll want to prioritize slab-on-grade foundations for your most vibration-sensitive equipment like microscopes, as these provide superior stability compared to elevated floors.
Never position sensitive instruments in lightweight steel or concrete structures above grade level, where they’ll be vulnerable to footfall vibrations.
Keep your equipment several feet away from mechanical and electrical systems to reduce background noise exposure.
Consider your floor’s natural frequency and stiffness when planning layouts, avoiding long-span floor systems for precision imaging work.
For maximum isolation, implement separate structural supports for floors and equipment mounts.
This targeted approach to equipment placement will greatly enhance your imaging results by minimizing vibration interference.
Create Isolation Zones
Establishing dedicated isolation zones within your lab represents the cornerstone of effective vibration management.
By strategically placing vibration-sensitive equipment on slab-on-grade foundations and away from building facades, you’ll greatly reduce transmission from external sources.
Create these isolation zones by positioning heavy equipment on specially designed slabs or springs that absorb vibrations before they reach your sensitive instruments.
- Your microscopy results will transform from frustrating blurs to crystal-clear images when you properly isolate your most sensitive equipment.
- You’ll eliminate the heartbreaking loss of time and resources caused by failed experiments due to vibration interference.
- Your research team’s morale will soar when consistent, reliable results become the norm rather than the exception.
During design, evaluate equipment placement to guarantee ideal distancing from potential vibration sources, prioritizing floor stiffness and mass.
Timing Your Imaging During Low-Activity Periods

The success of high-precision imaging often depends on choosing the right moment to collect your data.
Schedule your sessions during early mornings or late evenings when lab foot traffic and operational activities are minimal for effective noise reduction.
You’ll capture clearer, more reliable images when fewer colleagues are present to create vibrations from walking or operating equipment.
Sensitive instruments perform considerably better during these off-peak hours, with less interference from HVAC systems or nearby construction.
Establish a consistent imaging routine during these quiet periods to improve your experimental reproducibility.
Keep track of when your most successful sessions occur—this documentation will help you identify ideal windows for future work, ensuring you’ll consistently achieve high-quality results with minimal vibrational disruption.
Acoustic and Structural Damping Solutions
When traditional vibration isolation falls short, implementing acoustic and structural damping solutions can dramatically improve your imaging results.
Install acoustic panels around your sensitive equipment to absorb disruptive sound waves and minimize vibrations that interfere with precise imaging processes. Consider enhancing structural stability by using high-mass materials like concrete for equipment bases, effectively cutting vibration transmission pathways.
For extensive protection, you’ll benefit from combining multiple approaches:
- Floating floors that isolate your equipment from building vibrations, protecting your data from foot traffic disturbances
- Viscoelastic damping compounds at equipment mounting points that absorb microscopic movements before they affect results
- Soundproof enclosures that create a controlled environment, shielding your instruments from both airborne and structural interference
Frequently Asked Questions
How to Dampen 3D Printer Vibrations?
To dampen 3D printer vibrations, you’ll need to slow down print speeds, add mass to the printer frame, place it on stable surfaces, adjust calibration settings, and consider using custom flexible pads for specific vibration issues.
What Cancels Out Vibration?
Vibrations can be canceled out using isolation systems. You’ll find air tables, active electronic systems, added mass, vibration-absorbing materials, and proper placement away from vibration sources all effectively dampen unwanted movements in your equipment.
What Is the Best Way to Dampen Vibrations?
You’ll dampen vibrations best by using slab-on-grade foundations, passive vibration isolation tables, adding mass to equipment frames, and placing your equipment away from mechanical sources. Don’t forget to monitor and adjust positioning regularly.
How Can Vibration Be Reduced?
You can reduce vibration by slowing down printing speeds, adding mass to your printer frame, avoiding isolation pads, properly calibrating after changes, and using solid racks connected to building structures for maximum stability.
In Summary
Don’t ignore the impact vibrations have on your imaging results. By identifying sources, optimizing your lab’s physical setup, and implementing appropriate isolation systems, you’ll dramatically improve image quality. Remember that timing matters too—schedule critical imaging during quiet periods. Combining these seven approaches won’t just reduce frustration; it’ll enhance your research reliability and save countless hours of repeated work.


Leave a Reply